Chocolate Cupcakes with Peanut Butter Frosting

Chocolate and Peanut Butter Cupcakes
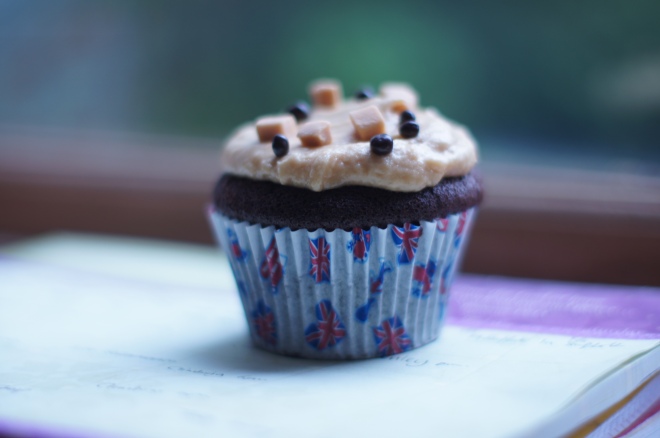
There is nothing better than chocolate and peanut butter. Together. In a cupcake.

I’ve been searching for the perfect chocolate cupcake recipe for a while, and I think this may be it. I used to always go by the Primrose Bakery chocolate cupcakes; however these are so much richer and less sickly sweet. They last a lot longer too, if they don’t get eaten immediately…

This recipe does have coffee in it, which may put people off making it, but don’t, because once it is cooked you cannot taste it. It just makes the chocolate flavour more intense.

And the peanut butter frosting. Words are not enough, just make it.

I’ll apologize in advance; the recipe is in cups… I hate weighing things in cups, but this recipe has some really weird numbers if it’s in grams, so sorry!

Makes 24 cupcakes

Ingredients:

1 1/2 cups  or 205g plain flour

3/4 cup or 70g cocoa powder

1 tsp baking soda

1 tsp baking powder

1/4 tsp salt

1 3/4 cups or 340g caster sugar

1/2 cup or 120ml sunflower oil (any unflavored oil will do)

2 eggs

1 1/4 cups or 300ml strong coffee, cooled

For the frosting:

2 cups icing sugar

1/2 cup smooth peanut butter

1/2 cup unsalted butter

2 tbsp milk
Mix
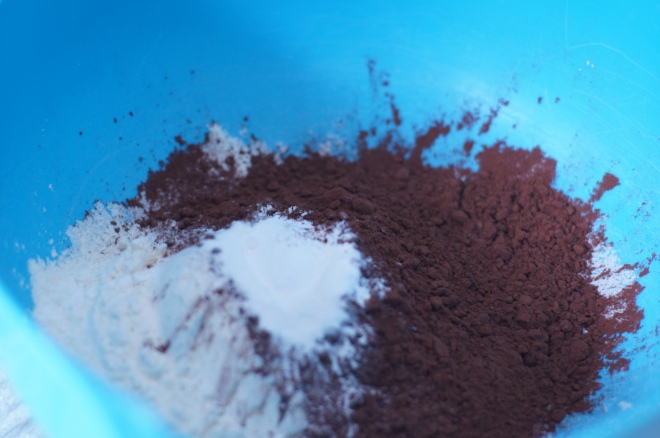
1. Preheat oven to 180 degrees. Whisk all the dry ingredients together in a bowl.

Wet ingredients
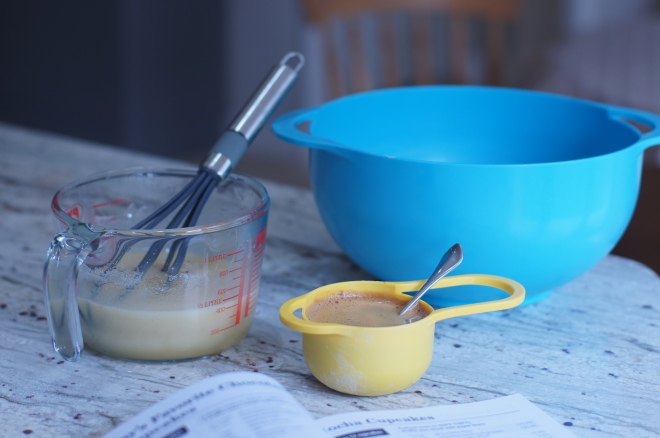
2. Whisk together the sugar, oil and eggs until smooth. Add the vanilla.

Chocolate cake mix
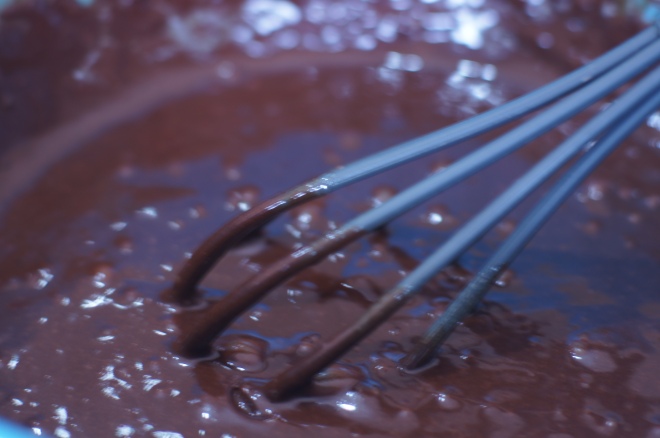
3. Alternate adding the sugar mix and the coffee to the flour. Whisk until smooth and glossy.

London cupcake caseSONY DSC
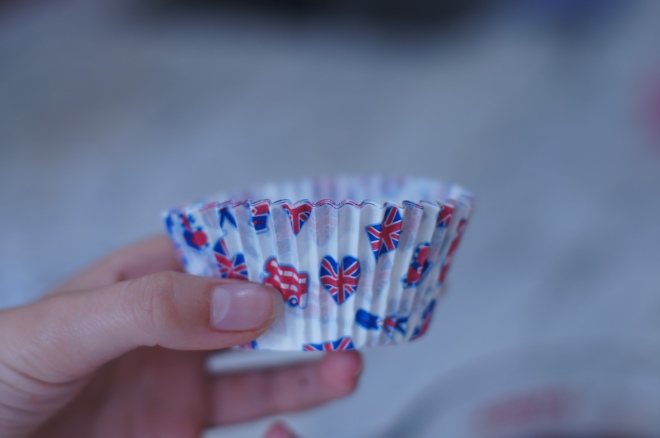
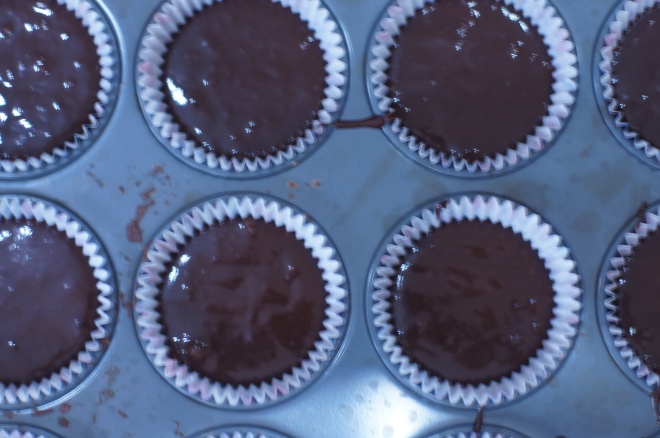
4. I got some gorgeous cupcake cases cheap after the Jubilee weekend, so they had to be used… Fill each case 2/3 full. I use an ice-cream scoop to get them all the same size. Put into the oven and bake for 20-25 mint

SONY DSC
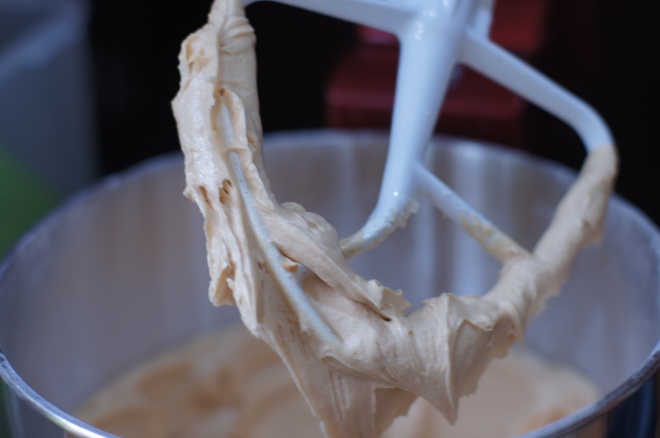
5. Whilst the cakes are cooking, make the frosting.  Beat the butter and sugar together with an electric mixer or handheld whisk until smooth. Add the peanut butter and milk and beat until light and fluffy. Try not to eat it all at this stage, tempting though it is…

SONY DSC
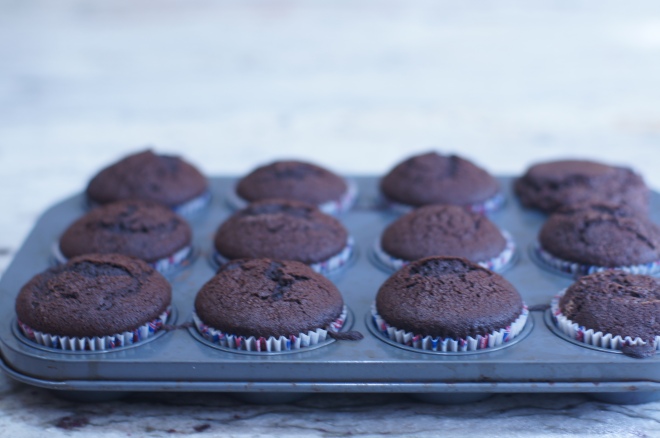
6. Leave the cakes to cool. They should be springy to the touch and a skewer should come out clean.

Peanut butter cakes7. Ice and decorate with whatever, I used fudge chunks and crunchy chocolate balls.

Cookies and Cream and Salted Caramel Cupcakes

The frosting on these is so yummy; just like a marshmallow, which makes me happy 😀

For the chocolate cupcakes:

3/4tsp baking powder

3/4tsp baking soda

Pinch of salt

1tsp vanilla extract

2 large eggs, separated

85g unsalted butter, at room temperature

115g good quality dark chocolate, 70% cocoa if possible

175g soft brown sugar

185g plain flour

250ml semi-skimmed milk, at room temperature

1.Firstly, preheat the oven to 170ºC (fan) /190ºC / 375ºF /gas mark 5.
2.Then, line either a muffin tin (for regular-sized cupcakes) or a mini cupcake tin with cupcake cases.
3.Melt the chocolate then leave to cool slightly.
4.Cream the butter and sugar together using an electric hand beater until pale and smooth. In a separate bowl and with clean beaters beat the egg yolks for several mins. Slowly add the egg yolks to the creamed butter and sugar and beat well. 5.Next, add the chocolate to this mixture and beat well.
6.Next, combine the flour, baking powder, bicarbonate of soda and salt. Combine the milk and vanilla in a jug. Add the flour mixture to the chocolate, butter and sugar, alternating with the milk and vanilla. Beat very well after each addition.
7.In a clean bowl, whisk the egg whites until soft peaks start to form. Carefully fold the eggs whites into the main batter using a metal spoon. Do not beat or you will take all the air out of the cake.
8.After that, spoon the mixture out equally into the tins depending on the preferred size. You do not need to fill the cases with mixture, about two-thirds full will work best as the cakes will rise considerably in the oven. The batter will be of a fairly liquid consistency so take care when spooning out as it can end up being very messy! You could even use a jug to pour the batter into the cupcake cases if it gets too difficult to spoon.
9.Place the trays in the oven and bake for between 20-25 mins for the regular size cupcakes or approx 15 mins for the mini cupcakes. Leave in their tins for 10 mins or so before placing on a wire rack to cool.

For the Marshmallow Frosting:

120g granulated sugar
80g golden syrup
1 1/2 tablespoons water
2 large egg whites
1/2 teaspoon vanilla extract [optional]

1.Cook the sugar, golden syrup and water over a high heat until the mixture reaches the soft-ball stage [115oc/239oF] on a sugar thermometer, which should take about 6 minutes. Remove from heat.

2.Meanwhile, in a clean bowl whisk the egg whites with an electric hand mixer until soft peaks start to form. With the blades still beating on a low speed, slowly pour the hot sugar syrup in a steady stream on to the egg whites. Continue to beat on a low speed until all the hot syrup is in the mixing bowl.

3.Increase the speed to medium-high and continue beating the mxture until it becomes thick, glossy and cool. Add the vanilla extract, if using, towards the end of the mixing process.

4.This makes enough to ice 12 regular cupcakes with a little left over to eat with your fingers out of the bowl. It’s best to work with it when it’s still slightly warm because it’s VERY sticky when it’s fully cooled down. It’s a bit trickier to work with than buttercream but not impossible. I wouldn’t recommend piping it, though. It would be better to swirl it on the top with a knife.


I then topped half the batch with salted caramel sauce :http://theboywhobakes.co.uk/2009/11/heaven-and-hell/

and the others with crumbled oreos.

They were a big hit at the cake sale I did for a Ugandan Orphanage

Chocolate Marshmallow Whoopie Pies

I made my first whoopie pie when I was about 12 and they were the ‘new craze’. I had no marshmallow fluff so the filling was properly sad and they were very strange. There are 2 things that put me off making them.

1. They have plain yoghurt in. Now I like yoghurt, but they don’t sell it in the corner shop and we never just have it in the fridge so it means I have to be organised. I’m not organised. So I never have the right ingredients…

2.They have a ridiculous name. I’m sorry, but which creative person made up the name ‘whoopie pie’? Its not even a pie! It annoys me no end. Some one eats one and asks what they are, how stupid do you sound saying, ‘oh its a whoopie pie’. One of my pet hates. Such a stupid name for an awesome food. The spell checker won’t even accept it, that’s how rubbish it is.

Moans aside, this attempt was so much better. Almost cookie like, soft centred cake sandwiched together with fluffy marshmallow cream. So yummy, took them to youth group and had to hoover up the crumbs but it was worth it 😉

I found marshmallow fluff so hard to come by, I can’t believe they don’t sell it in normal UK supermarkets! I think the should…

For the Sponge

1 large egg

150g (5.5ozs) Caster Sugar

125g (4.5ozs) Plain yoghurt

25ml (1fl oz) whole milk

¼ tsp vanilla essence ( I used extract)

75g (2.5oz) melted unsalted butter

200g (7oz) Plain Flour

80g (3oz) Cocoa Powder

¾  tsp bicarbonate of soda

¼ tsp baking powder

Filling

170g (6oz) unsalted butter

280g (10oz) icing sugar

220g (8oz) vanilla marshmallow fluff

Method

1/ Using a mixer cream the egg and sugar until fluffy. Pour the milk, yoghurt and vanilla essence into a bowl and mix together. Then add this mixture in with the beaten egg an sugar. Finally add in the melted butter and mix in thoroughly.

2/ Sift together the remaining dry ingredients, and then to the creamed mixture and mix well on a medium speed.

3/ Now place the batter mix in the fridge to rest for 20-30 minutes.

4/ Pre-heat the oven to 170C (325F), Gas Mark 3 and cover two baking trays with baking parchment.

4/ Once rested, spoon or pipe onto the baking trays making 8-10 mounds per tray. These need to be 2-3 cm spaced apart and around 3 -5 cm in diameter.

5/ Bake for 10-13 minutes or until they spring back when touched.

6/ Remove from the trays and place on a wire rack. They need to be completely cool before adding any filling to them.

7/ To make the filling mix the butter and icing sugar together using a hand whisk or standing mixer.  Once this is blended add the marshmallow fluff and then mix on a high speed until the mixture is light and fluffy. Place in the fridge for 30 minutes as this will firm up the mixture slightly.

8/ To sandwich the pies, take one sponge and spread a tablespoon of filling on one flat side. Follow this with sticking another sponge, flat side down onto the filling to make a sandwich. Continue this process to make the other whoopee pies.

The Perfect Victoria Sponge

  The Perfect Victoria Sponge

Believe it or not, this was actually the first Victoria Sponge I have ever made. I haven’t called it the ‘perfect’ sponge because I think mine is perfect, it’s good but I’m not that big headed, the recipe calls it this and I can see why! A Great British Bake Off recipe by Mary Berry; yum! I’ve done my very first step by step recipe (woo :D) so I hope you all like it, it’s a beautiful light sponge made by the creaming method.

You will need:

225g unsalted butter, softened

225g caster sugar

4 free-range eggs

1/2 a teaspoon vanilla extract

225g self-raising flour

1 tablespoon milk

For the filling:

200ml fresh double cream (optional)

6 tablespoons jam (any flavour)

25g white chocolate or icing sugar to finish

1.Preheat the oven to 180 degrees. Beat the softened butter with a spoon or electric whisk until smooth and creamy

2. Add the sugar in 3-4 separate additions and beat until light and fluffy

3. Crack the 4 eggs into a separate bowl, whisk up with the vanilla extract

4.Add the egg mixture to the butter and sugar and blend carefully, you don’t want to knock any air out

5.Sift the flour onto the mixture and then add the milk. Fold gently using a metal spoon

6.Scrap down the sides of the bowl with a spatula

7. Spoon the mixture evenly between the 2 greased tins and place in the oven for 20-25 minutes. It is ready when the top is golden brown and springy to touch

8. Remove from the tins and leave to cool.

9. Spread one half with whipped cream and one with jam

10. Sandwich together and ice or sprinkle with icing sugar

Mocha Cheesecake


This is such an easy, delicious cheesecake. I made it at school in a catering lesson, excuse the bad presentation because it did travel a mile home before ending up on a plate!

You will need:

200g chocolate Bourbons

100g butter (melted)

275g mascapone cheese

175ml double cream

50g caster sugar

2 teaspoons espresso powder dissolved in a tablespoon boiling water

  1. Crush the biscuits in a polythene bag by bashing with a rolling pin. Alternatively, use a blender.
  2. Stir in the butter and then press the mixture into a flan dish or sponge tin.
  3. Whip the cream until thick. Beat the mascapone until soft. Stir the whipped cream into the cheese and gently stir. Fold in the espresso and sugar.
  4. Spread the mixture over the crumb base and then chill before serving.

Cinnamon Rolls

These rolls are so delicious! Great for a early tea, afternoon snack or even breakfast.  I made these yesterday and my family adored them!

Recipe taken from allrecipes.co.uk

This recipe was for a bread maker, but I adapted it so it can be done without. See http://allrecipes.co.uk/recipe/4727/clone-of-a-cinnabon.aspx for the bread-machine version

  • For the dough:
  • 250ml warm milk (45 C)
  • 2 eggs, room temperature
  • 75g butter, melted
  • 600g bread flour
  • 1 teaspoon salt
  • 100g  caster sugar
  • 2 1/2 teaspoons quick yeast
  • For the filling:
  • 225g dark brown soft sugar
  • 2 1/2 tablespoons ground cinnamon
  • 75g  butter, softened
  • For the icing:
  • 100g  cream cheese, softened
  • 50g  butter, softened
  • 200g  icing sugar
  • 1/2 teaspoon vanilla essence
  • 1/8 teaspoon salt
  1.  Dissolve the yeast in the warm milk in a large bowl. Mix in the sugar, butter, salt and eggs. Add flour and mix well. Knead the dough into a large ball, using your hands dusted lightly with flour. Put in a bowl, cover and let rise in a warm place about 1 hour, or until doubled in size.
  2. In a small bowl, combine brown sugar and cinnamon.
  3. Roll dough into a 40x50cm (18×20 in) rectangle. Spread dough with 75g butter and sprinkle evenly with sugar/cinnamon mixture. Roll up dough and cut into 12 slices. Place buns in a lightly greased 23x33cm (9×13 in) baking tin. Cover and let rise until nearly doubled, about 30 minutes. Meanwhile, preheat oven to 200 C / Gas mark 6.
  4. Bake buns in preheated oven until golden brown, about 15 minutes. While buns are baking, beat together cream cheese, 50g butter, icing sugar, vanilla and salt. Spread icing on warm rolls before serving

It is a long process, but well worth it! I will certainly be making these again.

Really Easy Soft White Chocolate and Fudge Cookies

Some of the best cookies I have ever tasted, and so simple!

Makes 18 medium sized cookies

You will need:

200g butter

200g caster sugar

2 tbs golden syrup

300g self-raising flour

100g white chocolate chips

100g fudge chunks

1. Preheat the oven to 180 degrees. Grease 2 – 3 large baking trays (or bake in 2 batches)

2. Put the sugar and butter into a bowl and stir into a paste. Add half the flour, all the golden syrup and the fudge and white chocolate pieces and stir into a dough. Add the last 150g of flour and stir until completely mixed.

3. Use your hands to roll small balls of dough and spread them evenly on a baking tray. Do not set them too close as they will spread out and you don’t want them to touch.

4. Bake at the bottom of the oven for 8- 12 minutes, or until the edges of the cookies look brown. Remove from the oven and leave to cool completely on the tray; they will not look cooked when you get them out of the oven but once they cool they will harden into perfect cookies.

I love this recipe, It is the ultimate recipe for soft, sticky centred cookies!